
My pop up drain is not draining water
Hey there, we’re sorry to hear that you’re having issues with your Pfister faucet. We know it’s frustrating when something doesn’t work how it’s supposed to, but the good news is that there may be an easy fix to get you back up and running.
Review the information below and follow the links to find your specific model if you need to figure out what parts you need to order. And if at any point you feel lost, don’t hesitate to contact our customer service reps to help walk you through it.
Common Problems and Solutions
My pop-up drain does not drain water quickly
Problem: Water does not drain quickly when lowering lift rod
Solution 1: Increasing the stopper opening height.
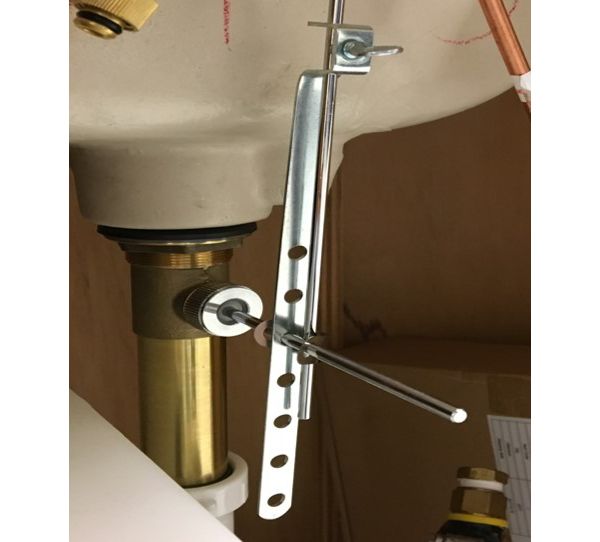
Adjust Clevis and Ball Rod
Let's start by lowering the pop-up lift rod at the back of your faucet. The pop-up stopper should be in the open position to allow for water drainage. We will then need to move to below the counter to adjust the ball rod position in the clevis (the long piece of metal with all of the holes in it). The issue may be the beginning angle of the lift rod does not deliver enough travel to lift the stopper to a height that allows water to drain at a normal rate. A minimum 1/4" to 1/2" lift of the stopper is recommended to allow for good drainage.
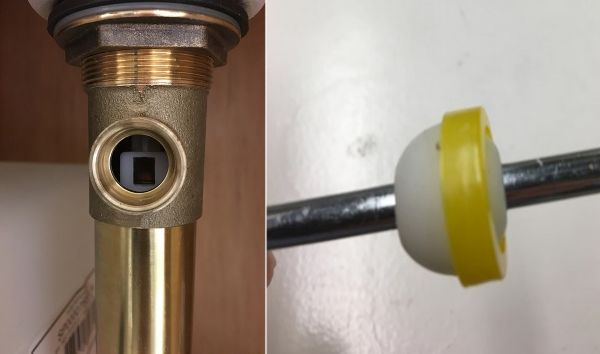
Remove clip from ball rod
Underneath your sink, you will notice the ball rod (metal rod with a ball on one end) that is attached to the middle of the drain and runs through a long, thin metal piece that has numerous holes (the "clevis"). The ball rod will have a clip that secures it to the clevis, remove this clip and remove ball rod from its current location in clevis.
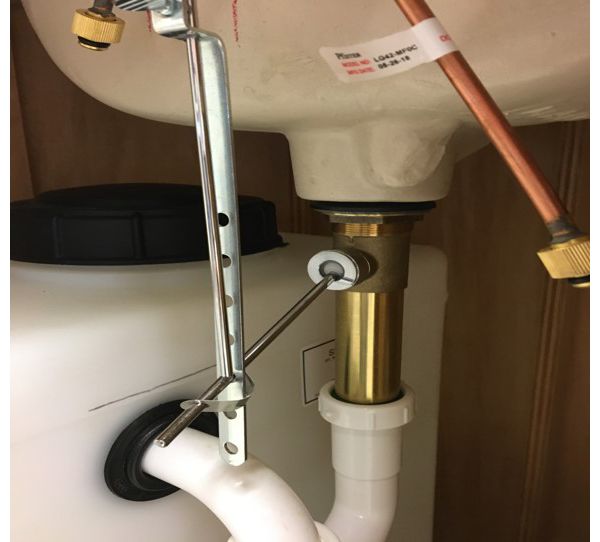
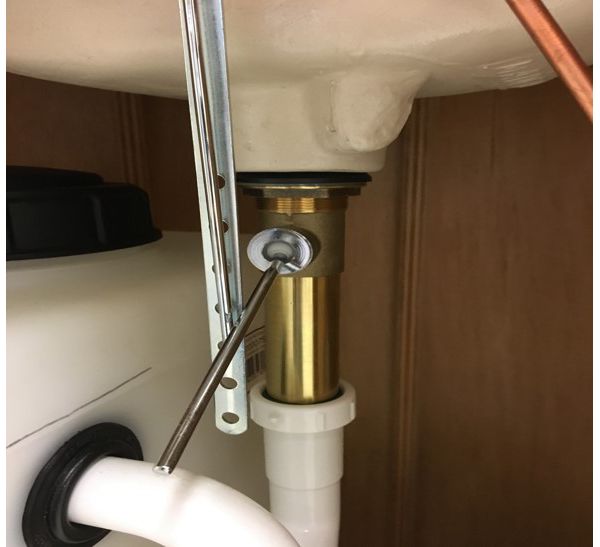
Place Ball Rod back through clevis
Now that you have the ball rod removed from the clevis, ensure that that the ball rod is in the full open position. You may need to push down on the ball rod to accomplish this. With the ball rod in the lowest position align with clevis and place ball rod through the closest hole that does not cause the push rod to be moved up. Ensure clip was re-installed to keep ball rod from disconnecting.
Test for Drainage
Turn on water, you may want to fill sink by closing stopper. Once you have a small amount of water sitting in the sink, Open stopper to check for drainage.
Solution 2: Removing the stopper and check for debris or other items that may be blocking the drain from working correctly.
Remove stopper from drain
Let's try removing the stopper and check for debris or other items that may be blocking the drain from working correctly. Go under the sink and unfasten the ball rod from the pop-up drain body by turning the nut counterclockwise.
Pull Stopper out of drain and clean
With the ball rod removed pull the stopper completely out of the drain assembly. Remove any debris that is on or around the stopper (long hair has a knack for winding itself around drains).
Check drain for any debris
With the stopper still removed, visually inspect the drain for any debris that may be stuck in the pop-up assembly. Any debris that can be reached should be removed. If debris is not visible, you may need to call a licensed professional to check your plumbing drains for a clog. If you installed your faucet yourself and are feeling adventurous, servicing a P-trap is a fairly easy thing to do. You might try that step first before calling in the cavalry.
Run Water with Stopper removed
First re-install the ball rod to keep water from leaking out of this area. Turn water on to determine if slow drainage is fixed.
Replace Stopper and Ball Rod
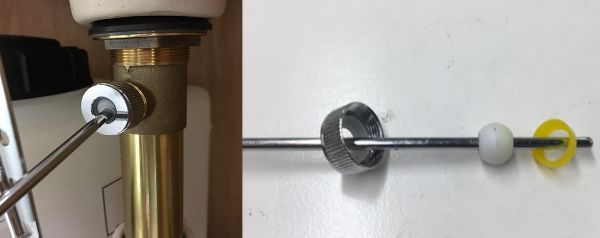
If clearing the drain of debris solved the problem, simply replace the stopper and reconnect the ball rod. Start by replacing the stopper so that the hole at the end is aligned with the opening in the drain (as shown). Before you reinstall the ball rod, check the washer to make sure it sits firmly on the end of the ball (as shown). Thread the ball rod through the hole and wiggle up and down to make sure the stopper moves (showing that you caught it). Tighten by turning the nut clockwise until it stops, and then give a 1/4 turn with a crescent wrench.
Water Still Srain Slowly?
We know it can be frustrating to have a plumbing problem and we want to help you figure out why this is still happening. We have a dedicated team ready to help. Please reach out when you can.
Call us at 1-800-PFAUCET (1-800-732-8238) or
My pop-up drain does not hold water
Problem: Water drains out of sink with plunger closed
Solution 1: Close Stopper
Adjust the pop-up rod
You can start by adjusting the connection between the pop-up rod and the clevis (the long, thin metal piece with all of the holes in it). These two are connected by a thumb screw, which can become loose. Adjust this connection as follows: 1. Loosen the thumb screw by turning counterclockwise, 2. pull up on the ball-rod (the one sticking straight out from the drain) as far as it will go. Peek above the sink to make sure the stopper is fully closed and that the pop-up rod is pushed all the way down, 3. re-tighten the thumb screw by turning clockwise.
Remove clip from ball rod
If adjusting the pop-up rod didn't do the trick, you can adjust the positioning of the ball rod within the clevis. Below the counter you will notice the ball rod (metal rod sticking straight out from the drain), which passes through the clevis at one of its many holes. Moving the rod to a higher hole may help the stopper close more tightly. The ball rod has a clip that secures it to the clevis, remove this clip, mark the current hole that the rod passes through, and remove ball rod from current location in clevis.
Place Ball Rod back through clevis
Now that you have the ball rod removed from the clevis, ensure that that the ball rod is in the full open position. You may need to push down on the ball rod to accomplish this. With the ball rod in the lowest position align with clevis and place ball rod through the closest hole that does not cause the push rod to be moved up. Ensure clip was re-installed to keep ball rod from disconnecting.
Fill Sink
Now pull up on pop-up rod to ensure stopper fully seated and fill sink with water and check that water does not drain out to quickly.
Solution 2: Check the actual stopper seal.
Remove stopper from drain
Below the counter remove the ball rod from the pop-up body to release the stopper. Above the counter remove the stopper from drain.
Clean Seal/Gasket
Clean/wipe away any debris that may be on the stopper o-ring.
Tighten Stopper
Ensure that the stopper cap is fully threaded to the body.
Re-Install Stopper & Ball Rod
Re-Install the stopper into the drain and below the deck re-install the ball rod into the pop-up body ensuring all seals are in place and ball rod placed through the clevis at the optimum location for full open and close (as you've done in the steps above).
Fill Sink
Now pull up on pop-up rod to ensure stopper fully seated and fill sink with water and check that water does not drain out to quickly.
Water Still Drain Slowly?
We know it can be frustrating to have a plumbing problem and we want to help you figure out why this is still happening. We have a dedicated team ready to help. Please reach out when you can.
Call us at 1-800-PFAUCET (1-800-732-8238) or
My pop-up drain is leaking under sink
Problem: Leaking under sink at junction of sink and pop-up
Solution: Check Washer or Putty Seal in sink bowl

Check Washer or Putty Seal in sink bowl
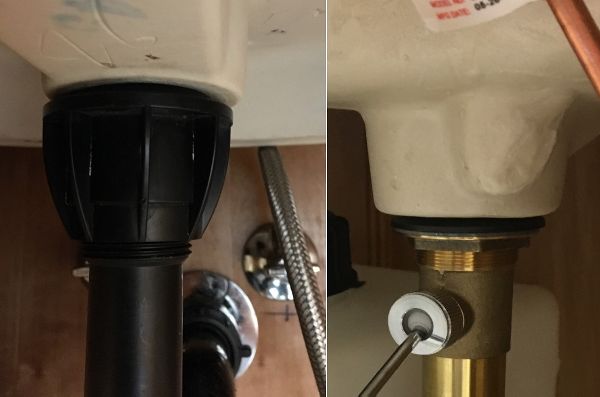
Start by inspecting the seat between the drain and the sink bowl. We have several types of drains - some use washers in this spot to create a watertight seal, where some require the use of plumber's putty when installing the drain. For those that use washers, check for the presence of a washer or for deformity or for gaps between the washer and sink surface or finish trim. Note: the Push and Seal drain (pictured right) has two washers: the thin one seals above the sink and the thick, tapered one seals below. For those that use plumber's putty, check for uniform coverage under the finish trim and consult instructions for the putty that was used. It may be necessary to re-install with a new application.
Note on sink types:
We also want to point out that the Push & Seal drain must be installed in sinks with an overflow. If you're installing on a new sink and are experiencing a heavy leak underneath the sink, double check your sink configuration.
Stopper Drain and Fill
Once washer is seated correctly or putty is uniformly distributed and trim is seated into drain hole, stopper the drain and fill with water to test for leaks.
Still leaking below deck after unstoppping
If the water held with no leaking but leaks once water is released or during running water, the leak may be where the bottom washer connects with the underside of the sink.
Check Washer below counter
Visually check the bottom seal washer to ensure that it has filled the bottom sink cavity and is not side loaded in any spot. It should be a nice even ring around the bottom of the sink and the drain should be pointed straight down.
Side loaded or pinched Washer
If the bottom washer appears to be pinched or side-loaded, release the bottom nut to allow you to release the tension and reposition the washer.
Re-tighten Bottom Nut
Re-tighten the bottom nut, paying attention to the washer to ensure even pressure on all sides. Make sure nut is tightened down as tight as possible. Note that many sinks--especially ceramic--have rough and uneven surfaces. It's important to get a nice, tight seal on your drain to make it water tight.
Run Water
Once drain is re-installed turn on the water and check for leaks.
Still Leaking?
We know it can be frustrating to have a plumbing problem and we want to help you figure out why this is still happening. We have a dedicated team ready to help. Please reach out when you can.
Call us at 1-800-PFAUCET (1-800-732-8238) or
Push Pop-up Not Closing
Problem: The push pop-up will not close when depressed
Solution: Remove push n seal stopper
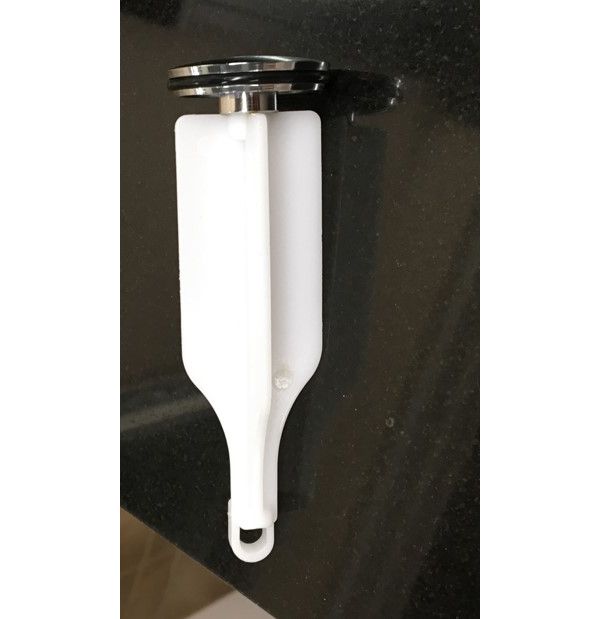
Remove push n seal stopper
The stopper on Push-n-seal threads in and out of the drain to allow for easy cleaning. You can remove it by grasping the drain cap (the decorative part, finished like your faucet) and twisting counterclockwise. Remove and check for debris in the area that might be impeding its closing.
Re-Install Stopper
Re-Install the stopper into the drain and fully tighten. With stopper installed press down to close stopper.
Not closing
If it's still not closing, we are here to help troubleshoot a little more and will send you a new one if we can't resolve it on the phone. Please call us at 1-800-PFAUCET (1-800-732-8238) so that we can help.
If you need to replace a part...
Find your faucet to view a full parts list
View all possible matching faucets to find your specific model. Then view the full parts diagram to identify the correct part numbers to order.
Contact us to help ID your faucet for you.
If you’re not sure what to do next, send us a photo of your faucet and we’ll identify it for you. We can usually get you an answer within 24hrs.
Consumer Service1-800-PFAUCET
(1-800-732-8238)
7:00am to 4:00pm PST, Mon-Fri
6:30am to 2:30pm PST, Sat
Closed Sunday and major holidays