
Hey there, we’re sorry to hear that you’re having issues with your Pfister faucet. We know it’s frustrating when something doesn’t work how it’s supposed to, but the good news is that there may be an easy fix to get you back up and running.
Review the information below and follow the links to find your specific model if you need to figure out what parts you need to order. And if at any point you feel lost, don’t hesitate to contact our customer service reps to help walk you through it.
My Two Handle Widespread is Leaking at the Spout, What's Wrong?
Problem: My bathroom faucet is leaking at the spout
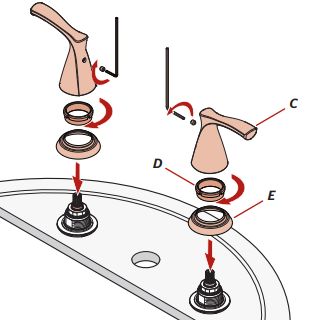
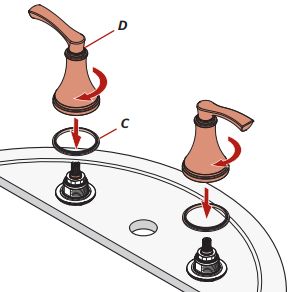
Remove the handle(s)
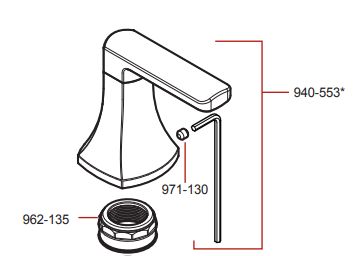
Set Screw Handle: Insert an Allen wrench (most likely 3/32" but could be smaller) into the small hole and move it until you feel it catch on the set screw. Turn it counter clockwise until the set screw is loose enough where you can pull the handle up and off, but do not completely remove the set screw. Set the handle aside.
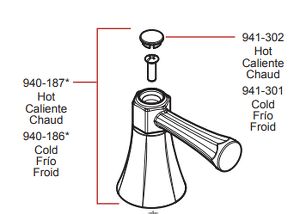
Top Screw Handle: Use a flat head screwdriver, pry bar or some other thin flat instrument to remove the button from the top of the handle. Now take a Phillips head screwdriver and remove the screw in the middle of the handle. Set that aside, then pull up on the handle to remove it. Set the handle aside.
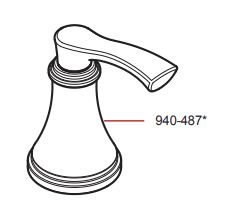
Fixed Hub Handle: Simply turn the base of the handle counter clockwise to unscrew it from the faucet. Set it aside.
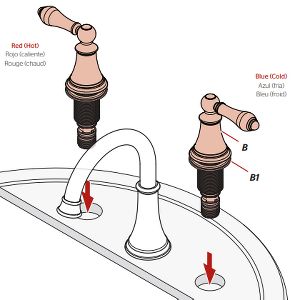
Unscrew the cartridge or cartridge nut
Depending on your faucet and type of cartridge, you'll now need to unscrew either the nut on top of the cartridge or unscrew the entire cartridge itself (refer to either the Maintenance Guide for your faucet or the directions for the cartridge to determine whether you have the separate nut or not). Either way, place an adjustable wrench on the hex nut at the top and turn counter clockwise to unscrew. If you have a separate nut, just set it aside for later.
Secure the cartridge
Depending on the type of cartridge, you'll now either screw the cartridge into the base or take the nut that you removed earlier and screw it onto the cartridge. Once it's hand tight, tighten another half to full turn with an adjustable wrench. DO NOT OVER-TIGHTEN. Over-tightening can crack the cartridge.
Put the handle(s) on
Now it's time to put the handle(s) back on. Depending on the handle type, the instructions are slightly different:
Set screw handle: Place the handle over the top of the cartridge and make sure it's lined up so that the handle is perpendicular to the spout in the off position (where it doesn't go back anymore). Insert a 3/32" hex wrench into the hole in the handle and tighten the set screw by turning counter clockwise until it's tight.
Top screw handle: Place the handle over the top of the cartridge and make sure it's lined up so that the handle is perpendicular to the spout in the off position (where it doesn't go back anymore). Place the screw in the top of the handle and tighten using a Phillips head screwdriver. Once the screw is tight, place the button on top of the handle and push down until it snaps in place.
Fixed Hub Handle: Place the handle over the top of the cartridge and make sure it's lined up so that the handle is perpendicular to the spout in the off position (where it doesn't go back anymore). Hold the handle and tighten the base down by turning it clockwise by hand until tight.
My To Handle Widespread Faucet is Leaking at the Handle, What's Wrong?
Problem: My bathroom faucet is leaking at the handle
My Widespread Bathroom Faucet is Leaking Under the Counter, What's Wrong?
Problem: My bathroom faucet is leaking below the counter
Dry everything off
Next, take a towel and dry off everything connected to the faucet and sink, including the underside of the faucet, the supply lines, the drain pipe and the angle stops. In particular, make sure any connection points (angle stop to supply line, supply line to faucet, etc.) are dry.
If you need to replace a part...
Find your faucet to view a full parts list
View all possible matching faucets to find your specific model. Then view the full parts diagram to identify the correct part numbers to order.
Contact us to help ID your faucet for you.
If you’re not sure what to do next, send us a photo of your faucet and we’ll identify it for you. We can usually get you an answer within 24hrs.
No Common Models Found
Consumer Service1-800-PFAUCET
(1-800-732-8238)
7:00am to 4:00pm PST, Mon-Fri
6:30am to 2:30pm PST, Sat
Closed Sunday and major holidays