
It sounds like either one or both cartridges in the handles need to be replaced. Don't worry: this is a pretty simple fix. We'll walk you through it step-by-step.
Troubleshooting
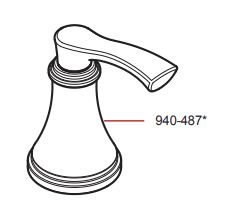
My widespread bathroom faucet is leaking or dripping
Hey there, we’re sorry to hear that you’re having issues with your Pfister faucet. We know it’s frustrating when something doesn’t work how it’s supposed to, but the good news is that there may be an easy fix to get you back up and running.
Review the information below and follow the links to find your specific model if you need to figure out what parts you need to order. And if at any point you feel lost, don’t hesitate to contact our customer service reps to help walk you through it.
How/where is it leaking from?
My Two Handle Widespread is Leaking at the Spout, What's Wrong?
Problem: My bathroom faucet is leaking at the spout
Solution: Replace your Two Handle Widespread Cartridge(s)
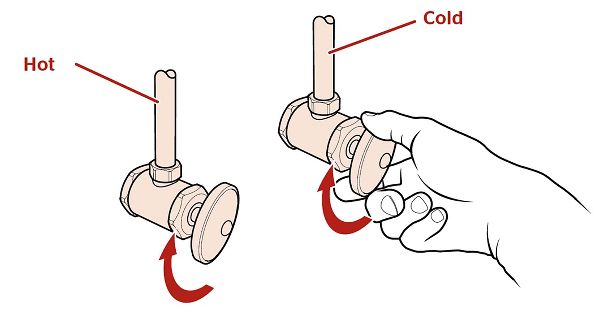
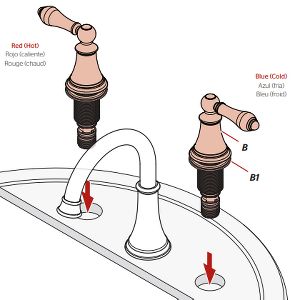
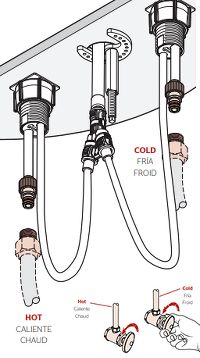
Figure out which handle is leaking
Let's start by testing to see which side of the faucet (hot or cold) is leaking. To do that, go under the sink and turn off the cold water at the wall by turning the knob clockwise. If the leak stops, then you need to replace the cold cartridge. If it continues, turn off the hot water side by turning the knob clockwise. If that stops the leak, then you need to replace the hot cartridge. If it doesn't, you may need to replace both cartridges.
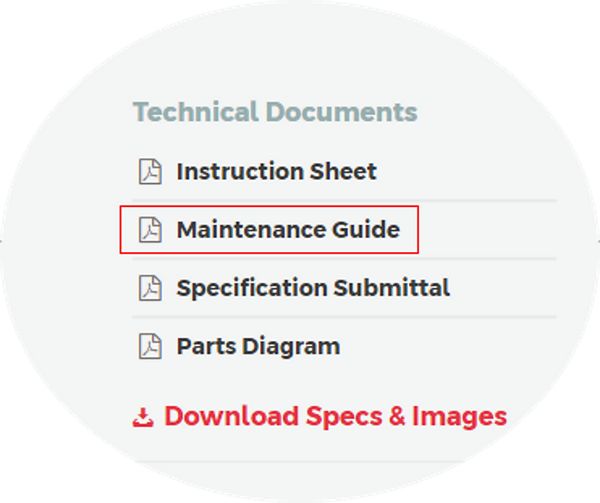
Find your Cartridge
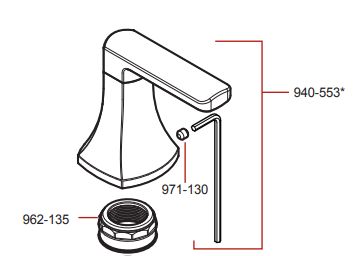
Once you know what cartridge(s) to replace, you need to figure out what replacement cartridge(s) you need. To do that, first, find your faucet by either typing in the model name/number in the search bar at the top or browse through our faucet listings. If your faucet is more than five years old, you may have to check the "show discontinued items" box at the top to find it. Once in there, find a document called "Maintenance Guide". There should be a diagram on there with links to all the parts, including the cartridge(s) you need.

Turn off the water supply
Once you have your cartridge, we're ready to make the repair. First things first: go under your sink and turn off your water supply at the wall by turning the knob on the stop clockwise. Turn on your faucet to drain out residual water and also to check to make sure the water is completely off.
Remove the handle(s)
Set Screw Handle: Insert an Allen wrench (most likely 3/32" but could be smaller) into the small hole and move it until you feel it catch on the set screw. Turn it counter clockwise until the set screw is loose enough where you can pull the handle up and off, but do not completely remove the set screw. Set the handle aside.
Top Screw Handle: Use a flat head screwdriver, pry bar or some other thin flat instrument to remove the button from the top of the handle. Now take a Phillips head screwdriver and remove the screw in the middle of the handle. Set that aside, then pull up on the handle to remove it. Set the handle aside.
Fixed Hub Handle: Simply turn the base of the handle counter clockwise to unscrew it from the faucet. Set it aside.
Unscrew the cartridge or cartridge nut
Depending on your faucet and type of cartridge, you'll now need to unscrew either the nut on top of the cartridge or unscrew the entire cartridge itself (refer to either the Maintenance Guide for your faucet or the directions for the cartridge to determine whether you have the separate nut or not). Either way, place an adjustable wrench on the hex nut at the top and turn counter clockwise to unscrew. If you have a separate nut, just set it aside for later.
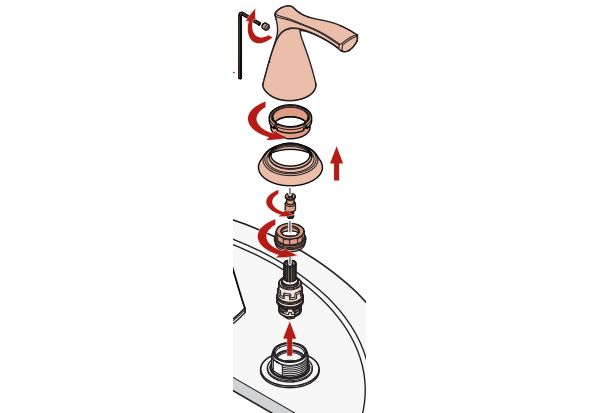
Remove the cartridge
Some cartridges, especially those for set screw handles, may have a screw in the top of the cartridge. Just use a small Phillips head screwdriver to remove the screw if it's there. On all faucets, pull the cartridge straight up to remove it, being careful to make sure you remove all pieces (some cartridges have springs at the bottom which may have come loose over time).
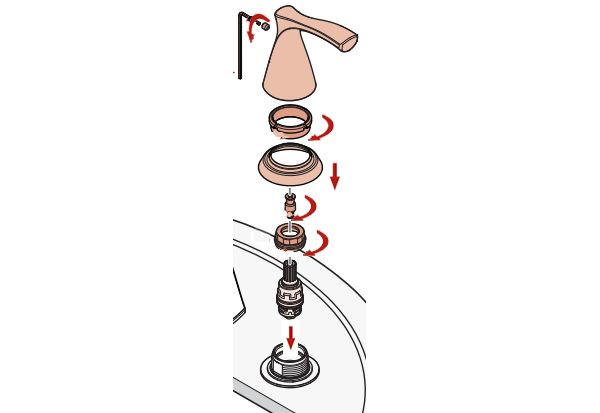
Install the cartridge
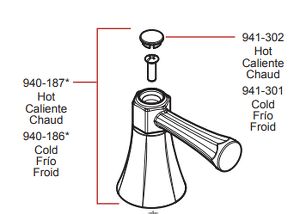
Now it's time to put the new cartridge in. One really, really, REALLY important note: the hot and cold are sometimes different cartridges (since they turn in different directions), so please double check that you're putting the correct one on the correct side before you install it (cold should be on the right and hot on the left). Once you're sure, drop the cartridge in, making sure it's lined up properly. If it needs a screw at the top, insert it now and tighten with a small Phillips head screwdriver.
Secure the cartridge
Depending on the type of cartridge, you'll now either screw the cartridge into the base or take the nut that you removed earlier and screw it onto the cartridge. Once it's hand tight, tighten another half to full turn with an adjustable wrench. DO NOT OVER-TIGHTEN. Over-tightening can crack the cartridge.
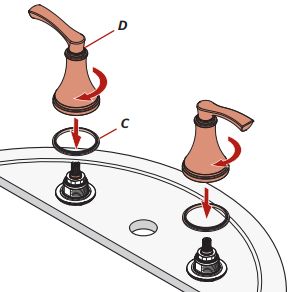
Put the handle(s) on
Now it's time to put the handle(s) back on. Depending on the handle type, the instructions are slightly different:
Set screw handle: Place the handle over the top of the cartridge and make sure it's lined up so that the handle is perpendicular to the spout in the off position (where it doesn't go back anymore). Insert a 3/32" hex wrench into the hole in the handle and tighten the set screw by turning counter clockwise until it's tight.
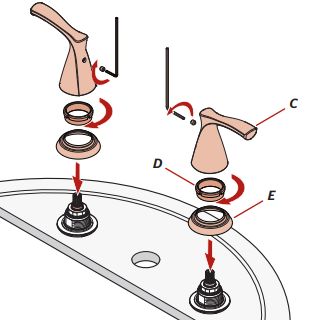
Top screw handle: Place the handle over the top of the cartridge and make sure it's lined up so that the handle is perpendicular to the spout in the off position (where it doesn't go back anymore). Place the screw in the top of the handle and tighten using a Phillips head screwdriver. Once the screw is tight, place the button on top of the handle and push down until it snaps in place.
Fixed Hub Handle: Place the handle over the top of the cartridge and make sure it's lined up so that the handle is perpendicular to the spout in the off position (where it doesn't go back anymore). Hold the handle and tighten the base down by turning it clockwise by hand until tight.
Turn On Water
Make sure the handle is in the off position, then turn on the water by turning the knob under the sink counter clockwise. To test to make sure the leak is fixed, turn on the water and let it run for a minute. Turn it off and check if the faucet is still leaking.
If the faucet is still leaking, you might have another issue. Feel free to give us a call at 1-800-PFAUCET to get additional help. You can also contact us via email here.
My To Handle Widespread Faucet is Leaking at the Handle, What's Wrong?
Problem: My bathroom faucet is leaking at the handle
Solution: Replace Your Tow Handle Widespread Faucet Cartridge(s)
It sounds like either one or both cartridges in the handles need to be replaced. Don't worry: this is a pretty simple fix. Please click here to follow the steps for Replacing Your Single Handle Control Cartridge.
My Widespread Bathroom Faucet is Leaking Under the Counter, What's Wrong?
Problem: My bathroom faucet is leaking below the counter
Solution: Find out where the leak is originating, please follow the walk through below.
We're sorry your faucet is leaking. Before we can tell you how to fix it, we need to figure out where the leak is coming from. Please follow the steps below to troubleshoot:
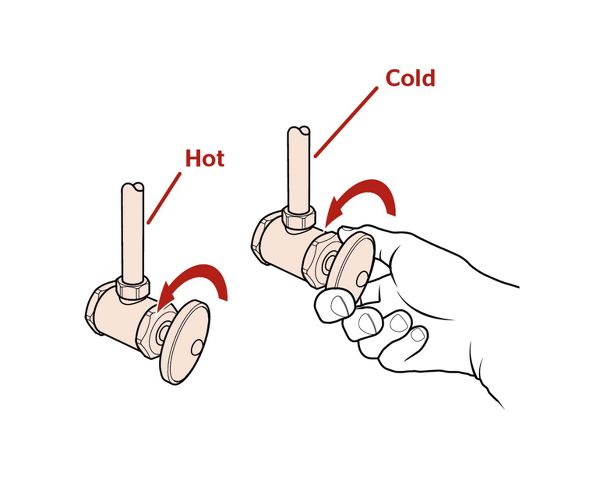
Shut the water off
We're sorry your faucet is leaking. Before we can tell you how to fix it, we need to figure out where the leak is coming from. First things first, let's shut the water off from both the hot and cold sides. Do this by going under your sink and turning the knobs on the angle stops by hand clockwise until they won't turn anymore. Note that, if your stops won't turn by hand, you can CAREFULLY use a wrench to try and get them to move but, once you get them turning, we highly recommend turning them the rest of the way by hand (trust us: you do not want to break an angle stop!).
Dry everything off
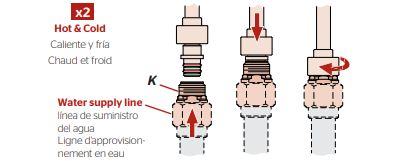
Next, take a towel and dry off everything connected to the faucet and sink, including the underside of the faucet, the supply lines, the drain pipe and the angle stops. In particular, make sure any connection points (angle stop to supply line, supply line to faucet, etc.) are dry.
Test for leaks - cold
Now we're going to check to see if we can find the leak. Start by turning on the cold water (usually the stop on the right side under the sink) first by turning the knob on the angle stop counter clockwise by hand. Now look carefully at the underside of your sink, particularly the connection points.
At the angle stop
-
Tighten supply line nut
If it's at the angle stop, there's a chance your supply line just needs tightened. Turn the water off at the angle stop, then take an adjustable wrench or groove joint pliers and carefully try to tighten the supply line nut until it feels snug. Dry off the area around the nut, then turn the water back on and check for a leak.
-
Replace supply line
If it's still leaking at the supply line, the seal on the supply line might be worn. You'll need to replace the whole supply line (don't worry: it's a pretty cheap fix!). Turn off the water, then disconnect your old supply line by unscrewing it at both ends (angle stop and faucet). We would recommend bringing the old supply line with you to your favorite home improvement retailer to make sure you get an exact replacement. Once you have a new supply line, simply attach it to both the faucet and the angle stop per the instructions on the supply line, then turn the water on and check for leaks.
-
Water still leaking
If the faucet is still leaking, you might have another issue. Feel free to give us a call at 1-800-PFAUCET to get additional help. You can also contact us via email here.
At the underbody
-
Tighten supply line nut
If it's at the point where your supply line connects with the faucet, there's a chance your supply line just needs tightened. Turn the water off at the angle stop, then take an adjustable wrench or groove joint pliers and carefully try to tighten the supply line nut until it feels snug. Dry off the area around the nut, then turn the water back on and check for a leak.
-
Replace supply line
If it's still leaking at the supply line, the seal on the supply line might be worn. You'll need to replace the whole supply line (don't worry: it's a pretty cheap fix!). Turn off the water, then disconnect your old supply line by unscrewing it at both ends (angle stop and faucet). We would recommend bringing the old supply line with you to your favorite home improvement retailer to make sure you get an exact replacement. Once you have a new supply line, simply attach it to both the faucet and the angle stop per the instructions on the supply line, then turn the water on and check for leaks.
-
Water still leaking
If the faucet is still leaking, you might have another issue. Feel free to give us a call at 1-800-PFAUCET to get additional help. You can also contact us via email here.
At the Supply Line
Replace supply line
If the supply line itself is leaking, you need to replace it (don't worry: it's a simple, cheap fix). Turn off the water, then disconnect your old supply line by unscrewing it at both ends (angle stop and faucet). We would recommend bringing the old supply line with you to your favorite home improvement retailer to make sure you get an exact replacement. Once you have a new supply line, simply attach it to both the faucet and the angle stop per the instructions on the supply line, then turn the water on and check for leaks.
Test for leaks - hot
If you didn't see water when the cold water was on, you should now turn on the hot water (usually on the left side under the sink) by turning the knob counterclockwise by hand. Now look carefully at the underside of your sink, particularly the connection points.
If you see water dripping, try and figure out exactly where it's coming from. Please click here to troubleshoot and keep in mind your are testing for leaks on HOT water.
Test for leaks - drain/sink
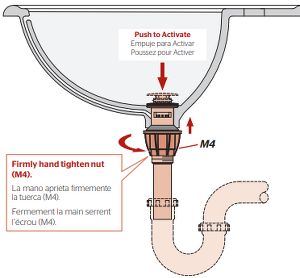
If you didn't find any leaks after turning on both the hot and the cold water, the next thing to check is the drain and the sink area. To do this, turn on the faucet (we recommend cold water) and look underneath the sink to see if you see any water dripping from anywhere. If you have a standard pop-up drain with a rod, make sure to check the back of the drain pipe where the rod goes in.
Leak from pop-up rod
-
Tighten pop up rod nut
If water is dripping from where the rod goes into the drain pipe, check to make sure the nut is properly aligned and tight, especially if you recently took up the pop-up rod out to clean your drain. First, turn the faucet off if it's still running. Now reach back behind the drain pipe, find the nut and turn it counter clockwise by hand until it's tight (tip: you might want to use a mirror to help you see it). Turn the faucet on and see if it's still leaking.
Check for cracks
If it's still leaking, check to see if the area around the hole is cracked (again, you can use a mirror to get a better look). If it is, you'll need to either patch the cracks with an epoxy or replace the drain pipe. If you don't see any cracks, you might need to replace the pop-up assembly.
-
Replace the pop-up assembly
If you need to replace the pop-up and your product is still under warranty, call us at 1-800-PFAUCET and we can help. Or feel free to email us.
Leak from elsewhere on pipe
Patch or replace pipe
If you have a leak in the drain pipe, you can try to patch or re-seal the pipe using an epoxy, or you may have to replace the entire drain pipe if the pipe has too much damage.
Sink itself is leaking
Patch/caulk the leak
If the leak is coming from in or around your sink rim, find the source where the water is coming from and try to patch or caulk the area to fix the leak. Note that sinks--especially ceramic--can have some variety in the dimensions of the bottom hole or in the smoothness of that area. If you are installing a new drain and there is water dripping from the area where the drain seats on the sink, managing an extra quarter turn to make sure the washer seats properly oftentimes fixes the problem
Can't find the source of the leak
If you can't find the source of the water, give us a call at 1-800-PFAUCET and we'll be happy to help.
If you need to replace a part...
Find your faucet to view a full parts list
View all possible matching faucets to find your specific model. Then view the full parts diagram to identify the correct part numbers to order.
Contact us to help ID your faucet for you.
If you’re not sure what to do next, send us a photo of your faucet and we’ll identify it for you. We can usually get you an answer within 24hrs.
Consumer Service1-800-PFAUCET
(1-800-732-8238)
7:00am to 4:00pm PST, Mon-Fri
6:30am to 2:30pm PST, Sat
Closed Sunday and major holidays